Quick Start
From install to a locked-down contributor account in about ten minutes — open the browser, work with files, attach a second drive, then grant someone scoped access.
Step 1: Open the file manager
Go to Components → Next File Manager. It opens on the File Manager tab, already browsing your Joomla install through the built-in site place. There is nothing to configure first — as a Super User you have every operation on every published place.
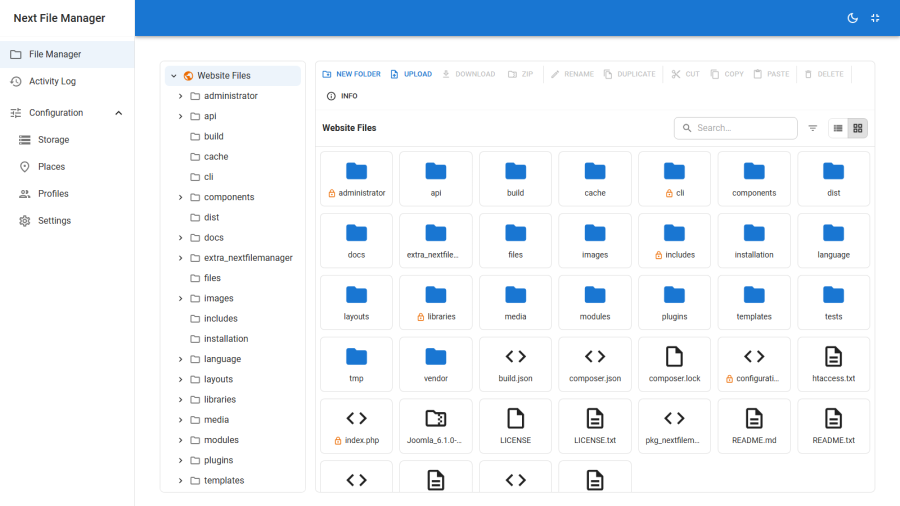
The layout is three parts:
- The folder tree on the left, lazily loading each level as you expand it.
- The browse pane in the middle, switchable between a tile grid and a sortable list with the toggle in the toolbar.
- Breadcrumbs above the pane, showing the place name followed by your path within it. Click any segment to jump back.
Select a file and click the info icon to open the info panel — size, type, modified date, full path and whether the item is protected.
See File browser for the full reference.
Step 2: Work with files
Everything is available from the toolbar, the right-click context menu, or a keyboard-friendly selection.
Upload — drag files anywhere onto the window. A queue appears in the corner showing each transfer's progress and result. Files that breach your profile's size or extension rules are rejected before the upload starts, and again on the server.
Edit — right-click a text or code file and choose Edit. A CodeMirror editor opens with syntax highlighting for PHP, JavaScript, CSS, HTML, JSON, SQL, XML and Markdown. Save writes the file back in place.
Preview — right-click an image or media file and choose Preview for a full-screen lightbox. Video and audio stream by byte range, so you can scrub without downloading the whole file.
Move — drag a selection onto a folder tile or a node in the tree. Archive — select several items and choose Create ZIP. Extract — right-click an archive and choose Extract.
Some menu entries are missing? Two reasons, both intentional. Your profile may not grant that command, or the drive you are on cannot support it — an S3 bucket has no true directories, for instance. See Storage.
Step 3: Attach another drive
To reach a filesystem other than the Joomla install, add a storage and then a place on it.
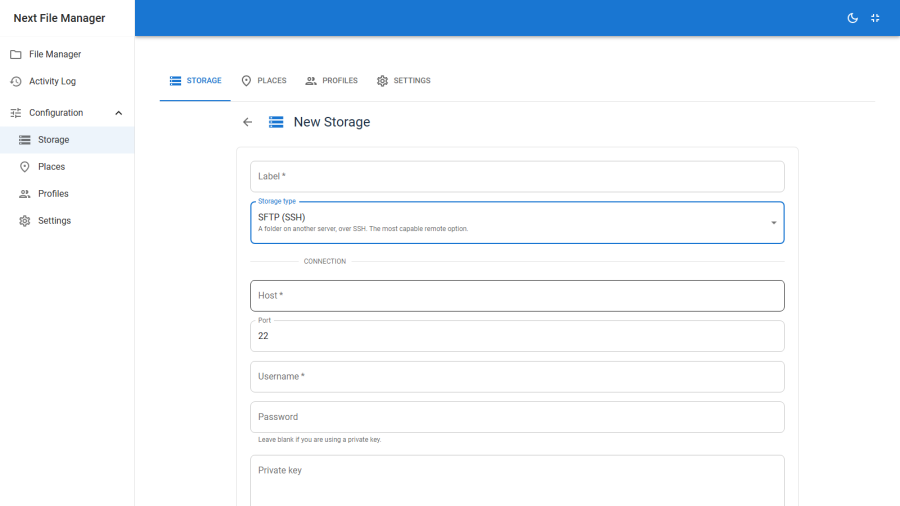
- Go to Configuration → Storage, then New.
- Pick a type — Server folder, SFTP (SSH), FTP/FTPS, WebDAV/Nextcloud or S3-compatible.
- Fill in the connection fields. Passwords and private keys are stored encrypted, keyed off your Joomla site secret, and are never sent back to the browser.
- Click Test Connection to verify it before saving. For SFTP the test also fills in the host key fingerprint for you.
- Save.
Then name the folders on it that you want to grant:
- Go to Configuration → Places, then New.
- Choose the storage you just created, give the place a label and the path within that storage it points at.
- Save, and publish it.
The place appears immediately in the file browser's place switcher.
Step 4: Grant someone scoped access
Users below Super User see nothing until a profile is assigned to them.
- Go to Configuration → Profiles, then New.
- Give it a title — "Contributor uploads", say.
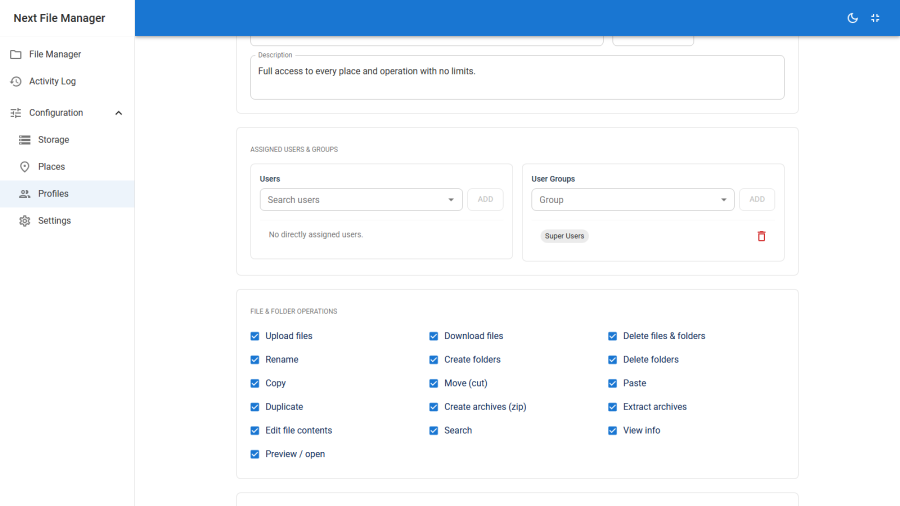
- Under File & Folder Operations, tick only what this role needs. For an upload-only contributor that is
upload,download,mkdir,rename,infoandpreview. - Under Roots, add a grant: pick a place, optionally type a subfolder within it, and tick Write if they may change things. They will see that subtree and nothing above it.
- Under Limits, set a max file size and, if you want, an allowed extensions list. The denied extensions list is always blocked regardless of what is allowed.
- Under Assignments, add the Joomla users or user groups this profile applies to.
- Save.
A direct user assignment takes precedence over a group one, so you can put a whole group on a restrictive profile and lift one person out of it.
See Profiles & access control.
What happens next
With those four steps done:
- Your Joomla install is browsable from the admin, with
configuration.php,.envfiles and private keys unreadable, and theadministrator/,libraries/,cli/andincludes/trees write-protected. Those defaults are on before you configure anything — see Protection. - Your second drive is one click away in the place switcher, with its credentials encrypted at rest and operations its protocol cannot support hidden rather than broken.
- Your contributor logs into Joomla and sees exactly their folder, with exactly the buttons you granted. Every check the interface makes is repeated on the server, so a crafted request gets the same answer as a hidden button.
- Everything they do is recorded. Open Activity Log to see uploads, deletions, renames, moves, copies, edits and archive operations with the user, the place and the path. See Activity log.
From here, the two things most sites tune next are the protected paths list and the global settings — the upload ceiling and the theme.