Demo Mode
Demo Mode fills Next Inventory with a realistic sample dataset, and optionally makes the site read-only for everyone except Super Users so a public demo cannot be vandalised. It is aimed at two situations: evaluating the component without typing data in, and running a public demo site that heals itself.
It ships switched off, and everything on this page is Super-User only.
Turning it on
Demo Data is an app, so it is switched on in the App Manager under Tools. Until you do, the Demo Mode tab does not appear in Settings at all.
This is one of the two apps that ship off — the other is the Progressive Web App. Demo Data seeds records and can make the site read-only, so it is something you opt into deliberately rather than something an update decides for you.
Installing the sample data
Configuration → Settings → Demo Mode → Install Demo Data. You are asked to confirm before anything is written.
It creates categories, warehouses, recipients, items with images, transactions, transfers, adjustments, stock movements, custom fields and cost layers — enough to make every screen look like a working system.
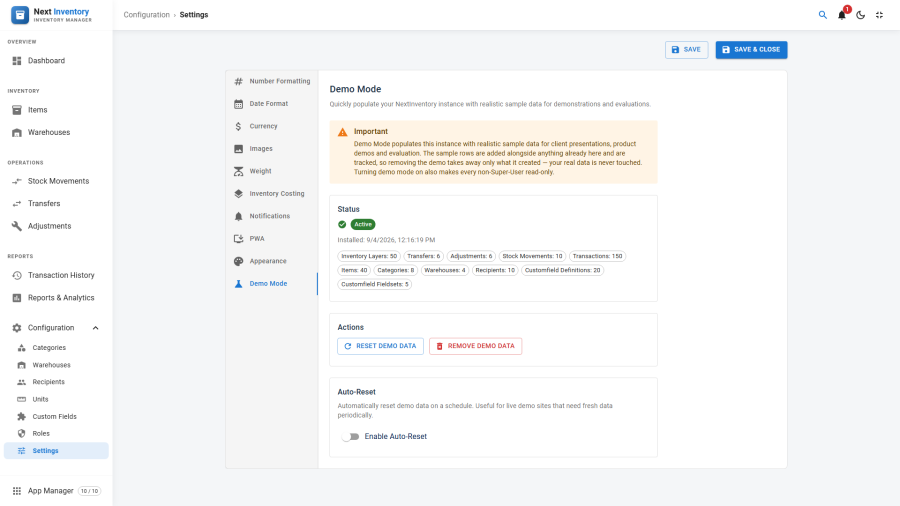
It is added alongside whatever is already there. Your own inventory is not touched, not moved, and not renamed. Every row the installer creates is recorded, so removal can take back exactly what it added and nothing else. If the install fails part-way through it undoes its own work rather than leaving strays behind.
Where a sample record would collide with something you already have — a category code or an item SKU has to be unique — the sample record is given a suffix. On a clean site nothing is suffixed and the data reads naturally.
What demo mode does to writing
While demo mode is on, everyone except Super Users is read-only, in the administrator and on the public site alike.
Visitors can move around freely: every list, filter, report, settings tab and the App Manager all open and display normally. Only writes are refused, with a message explaining why. A banner across the top says "Demo Mode — explore freely; your changes are not saved."
Super Users see a different banner, because for them the opposite is true: their changes are saved, for real.
That combination is deliberate. Hiding the screens a visitor cannot write to would hide most of the product, which rather defeats the point of a demo.
Removing it, and resetting it
Remove Demo Data deletes the rows the installer recorded, children first, and leaves everything else alone.
Reset removes and re-seeds in one step. Any edits made to demo records are lost — which is the point on a public demo — and your real data is untouched.
Demos installed by an older version
Warning. A demo installed by a version before 6.1.0 kept no record of what it created. There is no way to tell those rows apart from real ones, so removing such a demo clears all inventory data.
Next Inventory detects this case and says so plainly before you confirm, rather than quietly wiping the site. If you see that warning: take a backup first, and consider simply leaving the old demo data in place and installing a fresh demo alongside it instead.
Automatic resets
A public demo drifts as visitors — and Super Users — change things. Auto-reset puts it back on a schedule.
It takes two steps, and it is worth being clear that the setting alone does nothing.
Step 1 — switch it on
On the Demo Mode tab, enable Auto-Reset and choose an interval: every 12 hours, 24 hours, 3 days or 7 days.
Step 2 — create the scheduled task
The reset is actually run by Joomla's scheduler. Go to System → Scheduled Tasks → New and create a Next Inventory: Reset demo data task.
Schedule it hourly. The task checks the interval on each run and does nothing until one is due, so an hourly job with a 24-hour interval gives you one reset a day. Running it hourly simply means the reset happens close to when it falls due.
The task plugin is enabled for you when the package installs; you only need to create the job.
Its log says which of the three quiet outcomes applied on any run: auto-reset switched off, no demo installed, or not due yet.
Access control
| Action | Who |
|---|---|
| See the Demo Mode tab | Super Users, with the Demo Data app on |
| Install, remove or reset demo data | Super Users only |
| Write anything while demo mode is on | Super Users only |
Install, remove and reset became Super-User-only in 6.1.0. They previously ran on the delegatable manage settings permission, which meant anyone trusted with settings could reseed the database.
Edge cases
- The Demo Data app cannot be switched off while demo data is installed. Switching it off would hide the only screen that can remove the data, and on a locked-down site the only switch that lifts the lockdown.
- Demo data and demo lockdown are separate. You can install the sample data and leave the lockdown off — useful for evaluating with realistic content, or for taking screenshots, since the banner also shifts the layout down.
- Cost layers are seeded too, so a FIFO or LIFO demo shows real purchase costs rather than valuing everything at zero.
- Notifications are not seeded, so the Notification Centre starts empty and fills as the demo is used.
See also
- App Manager — where the Demo Data switch lives
- Settings — the tab itself